Settings
SHORTCUT ] screen.
If you save My Settings (function settings of the unit) to a storage device, you can load them to the unit immediately when you arrive in the booth or take over from another DJ, etc.
Changing the settings
1 Press and hold the [MENU] button.
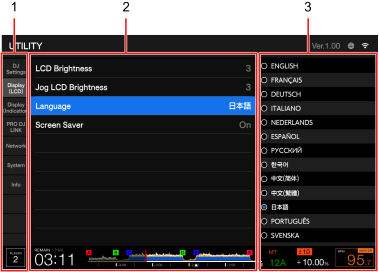
The [UTILITY ] screen appears.
1. Category
2. Setting items and current setting values
3. Setting values
2 Select a category.
⇨ Utility settings
3 Select a setting item.
4 Select a setting value.
• Press the [MENU ] button to close the [UTILITY ] screen.
Utility settings
Setting item
Description
Eject/Load Lock *1
Eject Lock : Determines whether or not you can unload a loaded track during playback.
Load Lock : Determines whether or not you can load another track during playback.
• Setting values: Unlock *2 , Lock
• [Eject Lock ]:Unlock ]: You can unload a loaded track during playback.Lock ]: You can’t unload a loaded track during playback.
• [Load Lock ]:Unlock ]: You can load another track during playback.Lock ]: You can’t load another track during playback.
Quantize Beat Value *1
• Setting values: 1/8 Beat , 1/4 Beat , 1/2 Beat , 1 Beat *2
Beat Jump Beat Value *1
BEAT JUMP
• Setting values: 1/2 Beat , 1 Beat , 2 Beat , 4 Beat , 8 Beat , 16 Beat *2 , 32 Beat , 64 Beat
Hot Cue Auto Load *1
⇨ Automatic call-up
• Setting values: Off , On *2
Hot Cue Color *1
HOT CUE ] (A to H ) buttons.
⇨ Setting a Hot Cue
• Setting values: Off *2 , On
Gate Cue*1
Determines whether or not gate playback is enabled when operating hot cues/loops.
• Setting values: Off *2 , On
*1
Determines whether or not a cue point is automatically set when a Hot Cue/Loop is set or playback starts from a Hot Cue/Loop.
⇨ Setting a cue point
⇨ Starting playback from a Hot Cue point
• Setting values: Off *2 , On
Auto Cue Level *1
• Setting values: Memory Cue *2 , Hot Cue , -78dB , -72dB , 66dB , -60dB , -54dB , -48dB , -42dB , -36dB
• [Memory Cue ]: Sets the saved cue/loop point closest to the beginning of a track to an Auto Cue point.
• [Hot Cue ]: Sets the saved Hot Cue/Loop point closest to the beginning of a track to an Auto Cue point.
Vinyl Speed Adjust*1
Sets the adjustment method for the playback starting and stopping speeds in Vinyl mode.
⇨ Adjusting the playback starting and stopping speeds (for Vinyl mode)
• Setting values: Touch&Release , Touch *2 , Release
Play Mode *1
• Setting values: Continue , Single *2
• [Continue ]: Automatically loads the next track when playback reaches the end of a track.
• [Single ]: Stops playback when playback reaches the end of a track. The next track isn’t automatically loaded.
*1 The settings are copied when you execute [Duplication ] in PRO DJ LINK category.
*2 Factory setting
Display (LCD) category
Setting item
Description
LCD Brightness*1
Sets the brightness of the main display.
• Setting values: 1 , 2 , 3 *2 , 4 , 5
Jog LCD Brightness*1
Sets the brightness of the jog display.
• Setting values: 1 , 2 , 3 *2 , 4 , 5
Appearance *1
• Setting values: Dark *2 , Light
Language *1
Screen Saver
Sets the screen saver.
• Setting values: Off , On *2
• When set to [On ], the screen saver starts if:
– You don’t use the unit for more than 5 minutes when a track isn’t loaded.
– You don’t use the unit for more than 100 minutes during pause, during cue standby, or after playback reaches the end of a track.
• Use the unit to cancel the screen saver.
*1 The settings are copied when you execute [Duplication ] in PRO DJ LINK category.
*2 Factory setting
Display (Indicator) category
Setting item
Description
Slip Flashing*1
Determines whether or not the indicators blink for buttons that can be used for Slip when you press the [SLIP ] button.
• Setting values: Off , On *2
On-Air Display*1
Determines whether or not the on-air information is displayed.
• Setting values: Off , On *2
Jog Ring Brightness*1
Sets the brightness of the jog ring illumination.
• Setting values: Off , 1 , 2 *2
Jog Ring Indicator*1
Determines whether the jog wheel ring blinks when the remaining time is running out on the track you are playing.
• Setting values: Off , On *2
Rotary Selector Brightness*1
Sets the brightness of the rotary selector LED.
• Setting values: Off , 1 , 2 *2
*1 The settings are copied when you execute [Duplication ] in PRO DJ LINK category.
*2 Factory setting
PRO DJ LINK category
Setting item
Description
Player No.
• Setting values: Auto *2 , 1 , 2 , 3 , 4 , 5 , 6
• The setting can’t be changed when a storage device is connected to the unit.
Duplication
Copies the Utility and some other settings on the unit to multi players connected in the PRO DJ LINK network.
• Setting values: ALL *2 , PLAYER 1 to 6
• This setting can’ be used for a multi player that is currently playing a track.
• The Utility settings marked with *1 in the Utility settings tables are copied.
⇨ Utility settings
• The following settings are also copied:
MIDI Channel
• Setting values: 1 *2 to 16
*2 Factory setting
Network category
Setting items
Description
Wi-Fi Setting
Sets up the connection via a wireless LAN (Wi-Fi) router (access point).
⇨ Connecting the unit to a wireless network
• Setting values: Off *2 , On
Wi-Fi Setting Duplication
Copies the access point connection settings of the wireless LAN (Wi-Fi) router to other multi players connected via PRO DJ LINK.
• Setting values: ALL *2 , PLAYER 1 to 6
• Not available if the [Wi-Fi Setting ] is set to [Off ].
Wi-Fi Address
Displays MAC address for the wireless LAN (Wi-Fi) connection.
Ethernet Info
Displays IP address and MAC address for the wired LAN connection.
*2 Factory setting
System category
Setting item
Description
Power Management
Sets the Power Management function.
⇨ Power Management
• Setting values: Never , 20min *2
Output Att.
Sets the attenuation level for the sound output from the unit.
• Setting values: -12dB , -9dB , -6dB , -3dB , 0dB *2
• This setting is invalid when DJ software is in use.
History Name
• The name can contain up to 32 characters (alphanumeric and symbol).
• If you change the name, the number succeeding the name of the History list resets to 001 (the number is automatically added in order when a History list is created).
Demo Mode*1
Sets whether or not to turn on LED of all buttons.
• Setting values: Off *2 , On
Restore Defaults
Restores the settings to the factory settings.
• Setting values: Cancel *2 , Ok
*1 The settings are copied when you execute [Duplication ] in PRO DJ LINK category.
*2 Factory setting
Info category
Setting item
Description
Serial No.
Displays the serial number.
License
Displays the license information of the unit.
Version No.
Displays the version of the software on the unit.
• An update available notice is displayed if updated firmware is available when the unit is connected to the internet.
■ Power Management
Power Management ] is set to [20min ], the unit automatically enters Off mode after 20 minutes without being used in the following ways.
– The unit isn’t connected in the PRO DJ LINK network.
– No storage device is connected to the unit.
– No PC/Mac is connected to the unit via the USB port on the rear of the unit.
Use the unit to exit standby mode.
• The factory setting is [20min ].
• The [QUANTIZE ] button lights up when the unit is in Off mode.
• Set [Power Management ] to [Never ] if you don’t need to use the Power Management function.
• Power consumption will increase if [Power Management ] is set to [Never ].
Wireless LAN (Wi-Fi ®
■ Connecting the unit to a wireless network
1 Press and hold the [MENU] button.
The [UTILITY ] screen appears.
2 Select [Wi-Fi Setting] in the Network category.
The [Wi-Fi Setting ] screen appears.
3 Touch [Wi-Fi] to turn it on.
The unit searches the network and available SSID are listed.
1.
2. Wi-Fi On/Off
3. SSID list
4 Touch the network (SSID) you want to use.
The password input screen appears.
5 Enter a password and touch [CONNECT].
If the connection succeeds, [Connected ] is displayed in the network name (SSID) field and it’s displayed at the top of the list.
• You don’t need to do this if you’re using an access point that’s connected with the unit previously.
• Touch the network (SSID) you’re using to view its information on the network information screen. If you turn on [Auto-Connect ] on the network information screen, the unit automatically connects to the access point the next time you use it.
• To delete the networks (SSID) saved to the unit, touch [SAVED NETWORKS ] at the bottom of the list. Select the networks (SSID) to delete in the list and touch [FORGET THIS NETWORK ] on the network information screen.
Setting items on the Shortcut screen
Setting items
Descriptions
Player settings
Selects the content (phase meter or enlarged waveform) to be displayed on the playback (waveform) screen.
• Setting values: PHASE METER , WAVEFORM *1
Time Mode
Sets the time display ([TIME ] (elapsed time) or [REMAIN ] (remaining time)).
• Setting values: REMAIN *1 , TIME
Auto Cue
Turns Auto Cue on and off.
• Setting values: OFF , ON *1
Hot Cue Auto Load
Same as the Utility settings.
⇨ Utility settings
Smart Cue
Gate Cue
Quantize Beat Value
Beat Jump Beat Value
LCD Brightness
Jog LCD Brightness
Device information
Displays the type and name of the device the track was loaded from.
Device settings
Waveform Color
• Setting values: BLUE , RGB , 3 BAND
Sets where to display the current playback point on the enlarged waveform.
• Setting values: CENTER , LEFT
Waveform Divisions
• Setting values: TIME SCALE , PHRASE
• [TIME SCALE ]: Displays scale marks at 30-second intervals.
• [PHRASE ]: Displays the phrase data analyzed by rekordbox.
• If phrase data isn’t saved, time scale is displayed.
Image On-Jog Display
• Setting values: ARTWORK , CUSTOM IMAGE
• [ARTWORK ]: Displays the artwork of the loaded track.
• [CUSTOM IMAGE ]: Displays a JPEG saved in your cloud storage or the root directory of the storage device that the loaded track is saved on. Images larger than 800 x 800 pixels can’t be displayed on this unit.
My Settings
LOAD
Calls up My Settings saved on a storage device.
⇨ Calling up My Settings saved on a storage device
SAVE
Saves the current My Settings to a storage device.
⇨ Saving My Settings to a storage device
*1 Factory setting
Saving My Settings to a storage device
• The Utility settings marked with *1 in the Utility settings tables are saved.
⇨ Utility settings
• The following settings are also saved:
• You can save the settings to rekordbox, rekordbox CloudDirectPlay, or a storage device connected to a multi player in the PRO DJ LINK network.
• You can specify the unit settings using rekordbox and save them on a storage device, then apply the settings to other multi players.
1 Connect a storage device to the unit.
⇨ Connecting a storage device
2 Press the [SOURCE] button.
The [SOURCE ] screen appears.
3 Select a device and load a track.
4 Press the [SHORTCUT] button.
The [SHORTCUT ] screen appears.
5 Touch [SAVE] in [My Settings].
The My Settings are saved on the storage device.
• Press the [SHORTCUT ] button again to close the [SHORTCUT ] screen.
Calling up My Settings saved on a storage device
• You can call up My Settings from rekordbox, rekordbox CloudDirectPlay, or a storage device connected to a multi player in the PRO DJ LINK network.
■ Calling up My Settings from the SHORTCUT screen
1 Connect a storage device to the unit.
⇨ Connecting a storage device
2 Press the [SOURCE] button.
The [SOURCE ] screen appears.
3 Select a device and load a track.
4 Press the [SHORTCUT] button.
The [SHORTCUT ] screen appears.
5 Touch [LOAD] in [My Settings].
My Settings are called up.
• You can’t call up My Settings when a track is playing. Pause playback before calling up the settings.
• Press the [SHORTCUT ] button again to close the [SHORTCUT ] screen.
■ Calling up My Settings from the SOURCE screen
1 Connect a storage device to the unit.
⇨ Connecting a storage device
2 Press the [SOURCE] button.
The [SOURCE ] screen appears.
3 Select a device.
4 Touch [MY SETTINGS LOAD].
My Settings are called up.
• You can’t call up My Settings when a track is playing. Pause playback before calling up the settings.
• You can call up My Settings from the Device Settings screen displayed by touching
⇨ SOURCE screen
 ,
,  ] buttons.
 (Wi-Fi connection icon)
 .
.