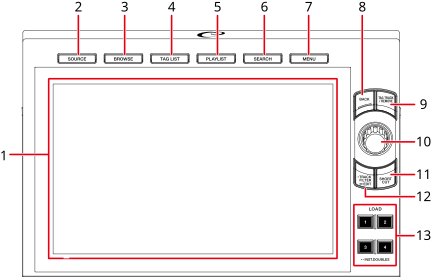
1.Touchscreen
2.SOURCE button
Displays the [SOURCE] screen.
3.BROWSE button
Displays the [BROWSE] screen.
4.TAG LIST button
Displays the [TAG LIST] screen.
5.PLAYLIST button
Displays the Playlist screen.
⇨Displaying the playlist screen
6.SEARCH button
Displays the Search screen.
7.MENU button
Displays menu items for the current screen (the function being used) or the Utility settings.
8.BACK button
⇨Returning to the next level up
9.TAG TRACK/REMOVE button
Adds tracks to, or deletes them from, the tag list.
⇨Registering a track to the Tag List
10.Rotary selector
11.SHORTCUT button
⇨Changing the settings on the Shortcut screen
12.TRACK FILTER/EDIT button
Narrows down tracks by tag information, BPM, or key, etc. set in rekordbox.
13.LOAD 1/2/3/4 buttons
Selecting a source
1Press the [SOURCE] button.
Devices connected to the unit are displayed on the [SOURCE] screen.
2Select a device.
This feature is only available when browsing the rekordbox library.
1Press the [SEARCH] button.
The Search screen appears.
2Enter a keyword using the keyboard.
Tracks including the keyword are displayed in the list.
•You can specify multiple keywords by separating them with a space.
The unit supports 2 jump modes.
1Press and hold the rotary selector when the alphabetical order list is displayed.
Alphabet Jump mode turns on, and the first character of the highlighted track or category is displayed on the screen.
•A to Z, 0 to 9, and some symbols are displayed in Alphabet Jump mode.
2Turn the rotary selector to scroll the screen.
The cursor jumps to the track or category whose first character is the same as the displayed character.
•The cursor doesn’t jump when there are no tracks or categories whose first character is the same as the displayed character.
1Press and hold the rotary selector when a list other than the alphabetical order list is displayed.
Page Jump mode turns on.
2Turn the rotary selector to scroll the screen.
The cursor jumps to the first or last track in the list on each page.
You can narrow down tracks by BPM, key, or the tag information, etc added by rekordbox. This feature is only available when browsing the rekordbox library.
1Press the [TRACK FILTER/EDIT] button.
Tracks are narrowed down by the currently set conditions.
Specifying the conditions on the Track Filter editing screen
1Press and hold the [TRACK FILTER/EDIT] button.
The Track Filter editing screen appears.
2Specify the filter conditions.
•You can choose BPM, key, rating, color, or the tag information added by rekordbox as filter conditions.
•Touch to add a check mark to enable the filter conditions.
•Touch [MASTER DECK] to read the BPM and key of the track playing on the deck set as the sync master.
•You can set the track filter conditions in rekordbox.
•The filter conditions are saved independently for each storage device.
■Searching by key of the track playing
The key icons of tracks which are good matches with the key (related key) of the track loaded to the master deck are displayed in green.
•This function isn’t available when no deck is set as the sync master.
■Searching with Information Jump
You can search for tracks of the same genre or BPM as the track whose details are displayed on the touchscreen.
1Touch  on the waveform screen.
⇨Playback screen (waveform screen)
The [INFO] screen appears.
1.Deck number: Touch to switch the decks and display the information of the track loaded on the relevant deck.
2.Detailed information of the track
3.EDIT RATING: Touch to change your rating of the track.
4. : Touch to return to the waveform screen.
2Select an item from the detailed information of the track.
Tracks included in the selected category are displayed on the browse screen.
•You may not be able to select items if any of the following conditions apply.
–There are no categories.
–Only icons are displayed in the detailed information of the track.
Monitoring sound before loading a track (Touch Preview)
You can monitor the sound of a track before loading the track.
1Connect headphones to the unit.
2Press the [LINK CUE] button.
3Touch the waveform displayed in the track list.
Monitor the sound from the touched point with your headphones.
•You can monitor the sound of a track while touching the waveform even when outputting the sound of a track that’s playing on the unit.
•You can’t monitor the sound of tracks which can’t be loaded to the decks.
1Select a track in the track list.
2Press the [LOAD 1/2/3/4] button.
The track is loaded to the corresponding deck.
•You can’t load another track while a track is playing when [Eject/Load Lock] is set to [Lock] in the Utility settings.
Set it to [Unlock], or press the [ ] button to pause playback, then load another track.
•When Auto Cue is turned on, playback is paused at the start of a track. Press the [] button to start playback.
■Loading a track using the track menu
You can display the track menu by pressing the rotary selector when a track is selected on the Browse, Playlist, Search, or Tag List screen.
You can then load a track from the track menu.

1.DECK 1 to 4
Loads a track to the deck and starts playback.
2. (Cancel)
Closes the track menu.
Tracks played for approximately 1 minute are recorded in the History (playback list) (up to 999 tracks).
•A new History is automatically created on a storage device when it’s connected to the unit.
•If you play a track more than once in succession, it may not be recorded in History.
•The information such as name of tracks recorded in History is displayed in green (indicates that the track has been played).
•You can create a playlist from the History using rekordbox. For details, refer to the rekordbox for Mac/Windows Instruction Manual.
■Viewing History
1Press the [BROWSE] button.
The [BROWSE] screen appears.
2Select [HISTORY] in the category.
The History list is displayed.
■Deleting History
1Select a History you want to delete in the History list and press the [MENU] button.
The deletion menu appears.
2Select [DELETE] or [ALL DELETE].
—[DELETE]: Deletes the selected History.
—[ALL DELETE]: Deletes all History lists.
•If you create a playlist from the History using rekordbox, the HISTORY is deleted from the storage device.
You can tag a track you want to play next or tracks you think will work well in your performance and review them via the Tag List.
•One Tag List is created for each storage device, CloudDirectPlay, or Beatport Streaming. A track can’t be registered to multiple devices.
•Up to 100 tracks can be registered to the Tag List on each storage device.
•A track can’t be registered to a Tag List more than once.
■Tag list screen
1.Device icon
Displays the icon of a device selected on the [SOURCE] screen.
2.Tag list
Displays the Preview waveform, artwork, serial number, and track list in the taglist.
•Touch the waveform in the [Preview] column to monitor the sound before loading a track.
⇨Monitoring sound before loading a track (Touch Preview)
•Touch the title row to sort the list.
•Touch  on the title row to display the sub-column selection screen and select a sub-column to be displayed. To set sub-columns you want to display in the selection list (except for Beatport Streaming), go to [Preferences] in rekordbox.
3.PREVIEW
Displays or hides the [PREVIEW] column.
4.Font size setting
Sets the font size.
5.Connection status icons
—(Internet connection icon): Displays the status of the internet connection.
— (Wi-Fi connection icon): Displays the status of the Wi-Fi connection. Touch to display the Network category of the Utility settings.
— (Bluetooth connection icon): Displays the status of the Bluetooth connection. Touch to display the Bluetooth category of the Utility settings.
6.Rec timer
Displays the recording time when using Master Rec.
Touch to display the [MIXER SETTINGS] screen.
7. (Information)
Displays the detailed information for the loaded track.
■Registering a track to the Tag List
•You can add tracks included in a folder or playlist to the Tag List instantly by selecting a folder or playlist.
2Press the [TAG TRACK/REMOVE] button.
A check mark is displayed for the tracks registered to the Tag List.
•You can also register tracks loaded on the deck to the Tag List by pressing the [TAG TRACK/REMOVE] button on the [INFO] screen.
■Deleting a track from the Tag List
Deleting an individual track on the Tag List screen
1Highlight a track.
2Press and hold the [TAG TRACK/REMOVE] button.
The track is deleted from the Tag List.
Deleting an individual track on the Browse, Playlist or Search screen
1Highlight a track.
2Press the [TAG TRACK/REMOVE] button.
The track is deleted from the Tag List.
Deleting all tracks at once
1Press the [TAG LIST] button.
The [TAG LIST] screen appears.
2Press the [MENU] button.
[MENU] is displayed.
3Select [REMOVE ALL TRACKS].
All tracks in the Tag List are deleted.
•If you delete a track from the Tag List while playing, the track continues to play until the end. The next track won’t play.
■Converting the Tag List to a playlist
A playlist converted from the Tag List is displayed in the [PLAYLIST] category.
•You can’t convert the Tag List to a playlist if the rekordbox library isn’t saved on the storage device or in CloudDirectPlay.
•If a mixture of tracks – some managed and some not managed by rekordbox – are registered in the Tag List, only the tracks managed by rekordbox are converted to a playlist.
1Press the [TAG LIST] button.
The [TAG LIST] screen appears.
2Press the [MENU] button.
[MENU] is displayed.
3Select [CREATE PLAYLIST].
The Tag List is converted to a playlist with the name [TAG LIST XXX].
Displaying the playlist screen
Press the [PLAYLIST] button to display the Playlist screen. You can also display the Playlist screen from the browse screen.
1.Playlist Bank
Displays the playlist when a playlist is registered to a Playlist Bank.
⇨Registering a playlist to a Playlist Bank
With Playlist Banks, you can find a playlist without browsing the folder hierarchy.
2.Category
Displays the [PLAYLIST] category.
3.Device icon
Displays the icon of a device selected on the [SOURCE] screen.
4. (Back)
Displays the next level up.
5.Next level up display
Displays the name of a folder or device in the next level up.
6.PREVIEW
Displays or hides the [PREVIEW] column.
7.Font size setting
Sets the font size.
8.Connection status icons
—(Internet connection icon): Displays the status of the internet connection.
— (Wi-Fi connection icon): Displays the status of the Wi-Fi connection. Touch to display the Network category of the Utility settings.
— (Bluetooth connection icon): Displays the status of the Bluetooth connection. Touch to display the Bluetooth category of the Utility settings.
9.Rec timer
Displays the recording time when using Master Rec.
Touch to display the [MIXER SETTINGS] screen.
10. (Information)
Displays the detailed information for the loaded track.
11.Track list
Displays the Preview waveform, artwork, serial number, and the track list in the playlist.
•Touch the waveform in the [PREVIEW] column to monitor the sound before loading a track.
⇨Monitoring sound before loading a track (Touch Preview)
•Touch the title row to sort the list.
•Touch on the title row to display the sub-column selection screen and select a sub-column to be displayed. To set sub-columns you want to display in the selection list (except for Beatport Streaming), go to [Preferences] in rekordbox.
Changing the status of a track in a playlist to PLAYED or UNPLAYED
•You can also change the status of a track in other lists than a playlist in the same way.
1Press the [MENU] button when a track in a playlist is selected.
[MENU] is displayed.
2Select [PLAYED] or [UNPLAYED].
—[PLAYED]: Sets unplayed tracks to “played”. Tracks set to “played” are displayed in green and registered to the History.
You can’t select [PLAYED] when a played track is selected.
—[UNPLAYED]: Sets played tracks to “unplayed”. Tracks set to “unplayed” are displayed in white and deleted from the History.
You can’t select [UNPLAYED] when an unplayed track is selected.
Deleting a playlist
1Press the [MENU] button on the [PLAYLIST] screen.
[MENU] is displayed.
2Select [DELETE] or [ALL DELETE].
—[DELETE]: Deletes the selected playlist.
—[ALL DELETE]: Deletes all playlists.
■Registering a playlist to a Playlist Bank
1Highlight a playlist on the [PLAYLIST] screen.
2Select a Playlist Bank whose icon is displayed in gray.
The playlist is registered to the Playlist Bank and the icon turns white.
•Select a Playlist Bank with a white icon to display tracks in the registered playlist.
■Deregistering a playlist from a Playlist Bank
1Select  in the Playlist Bank.
Deregistration mode turns on and × is displayed alongside Playlist Bank icons.
2Select the Playlist Bank to deregister the playlist from.
The playlist is deregistered and deregistration mode turns off.