Top panel
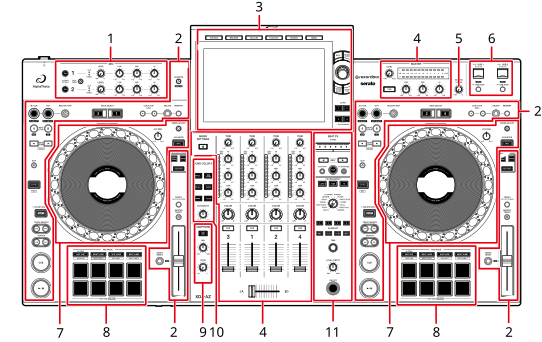
1.MIC section
2.Deck section
3.Browse section, Touchscreen
4.Channel section/Master section
⇨Channel section/master section
5.BOOTH section
6.USB section
7.Jog wheel section
8.Performance Pads section
9.Headphones section
10.Sound Color FX section
11.Beat FX section

1.SonicLink headphones indicator
⇨Monitoring sound with SonicLink headphones
2.PAIRING button
⇨Monitoring sound with SonicLink headphones
3.PHONES terminals
Connect headphones to one of the terminals (1/4” stereo jack or 3.5 mm stereo mini jack). Using both terminals at the same time may lower the sound quality or volume level.

1.Kensington security slot
Connect a cable lock.
2. USB port
Connect a PC/Mac.
3.LINK port
Connect to a LAN port on a PRO DJ LINK compatible player or a PC/Mac running rekordbox.
•To connect to a LAN port on a PRO DJ LINK compatible player, set [PRO DJ LINK Mode] to [On] in the Utility settings.
•For wired LAN connections, use a CAT5e (or higher) STP cable.
4.MASTER 1 terminals (balanced XLR)
Connect to analog input terminals on a power amplifier and powered speakers, etc.
•Use the terminals for balanced output only. Connecting the terminals to unbalanced inputs (RCA, etc.) with an XLR-RCA conversion cable (conversion adapter), etc. results in unwanted noises and/or poor sound quality.
•Do not connect a power cord from another product to the terminals.
•Do not connect to a terminal that can supply phantom power.
•Use the [MASTER 2] terminals for unbalanced input (RCA, etc.).
5.MASTER 2 terminals (RCA)
Connect to analog input terminals on a power amplifier, etc.
6.BOOTH terminals (1/4”/6.35 mm, TRS)
Connect a booth monitor.
•Use the terminals for balanced output only. Connecting the terminals to unbalanced inputs results in unwanted noises and/or poor sound quality.
7.Signal GND terminal
Connect a turntable’s ground wire.
Reduces unwanted noises that occur when a turntable is connected to the unit.
8.LINE/PHONO terminals (RCA)
Connect multi players, line-level output devices, or phono-level (MM cartridge) output devices.
•A loud volume may be output depending on the input signal. Make sure that the input signal matches the settings.
9.MIC 1 terminal, MIC 2 terminal (XLR or 1/4”/6.35 mm, TRS)
10.AC IN
Connect to a power outlet with the supplied power cord.
11. button
Turns the unit on and off.
Press the [SOURCE] button to display the source selection screen.
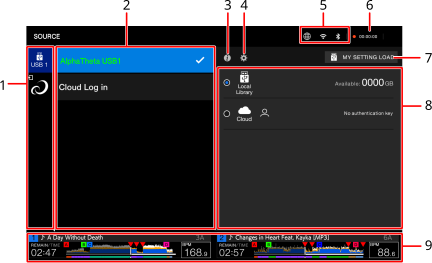
1.Device icon
Displays the connected device.
•If [Background Color] is set for the device, the icon’s background is displayed in the chosen color.
2.Device name/status
Displays the device name and status.
3.Device information
Touch  to display the information for the highlighted device.
4. (Device setting)
Select a device or cloud storage to set the following.
–[Waveform Color]: Sets the waveform color.
–[Background Color]: Sets the background color saved on the selected USB device. This setting is also applied to colors for a part of the touchscreen.
–[Display username on-screen]: Sets whether or not to display the nickname registered in your cloud storage on the touchscreen of the unit.
– [Log Out Time]: Sets the amount of time until you’re automatically logged out of the cloud if you haven’t used rekordbox CloudDirectPlay or streaming services (Beatport, TIDAL) during that time. This is only displayed when you log in to the cloud using [Cloud Log In].
–[MY SETTINGS LOAD]: Calls up the Utility settings and some other settings saved on the selected USB device
⇨Calling up My Settings saved on a USB device
5.Connection status icons
—(Internet connection icon): Displays the status of the internet connection.
— (Wi-Fi connection icon): Displays the status of the Wi-Fi connection. Touch to display the Network category of the Utility settings.
— (Bluetooth connection icon): Displays the status of the Bluetooth connection. Touch to display the Bluetooth category of the Utility settings.
6.Rec timer
Displays the recording time when using Master Rec.
Touch to display the [MIXER SETTINGS] screen.
7.MY SETTINGS LOAD
Calls up the Utility settings and some other settings saved on the selected USB device.
⇨Calling up My Settings saved on a USB device
8.Library display
Displays the library.
–[Local Library]: Browses the rekordbox library on the selected USB device.
–[Cloud]: Browses the rekordbox library in your cloud storage.
9.Deck display
Press the [BROWSE], [TAG LIST], or [PLAYLIST] button to display the browse screen (track list).
You can browse a storage device, CloudDirectPlay, the rekordbox library on a connected PC/Mac or mobile device, and Beatport Streaming.
•If you browse a storage device that doesn’t contain a rekordbox library on the [BROWSE] screen, the folder and track lists are displayed in a hierarchical structure.
When you press the [BROWSE] button
1.Category
Displays the categories.
•Go to [Preferences] in rekordbox to choose the categories you want to display (you can’t set the categories for Beatport Streaming with rekordbox).
2.Device icon
Displays the icon of a device selected on the [SOURCE] screen.
3. (Back)
Displays the next level up.
4.Next level up display
Displays the folder or device name in the next level up.
5.Track list
Displays the Preview waveform, artwork, and the track list of the selected hierarchical level or playlist.
•Touch the waveform in the [PREVIEW] column to monitor the sound before loading a track.
⇨Monitoring sound before loading a track (Touch Preview)
•Touch the title row to sort the list.
•Touch  on the title row to display the sub-column selection screen and select a sub-column to be displayed. To set sub-columns you want to display in the selection list (except for Beatport Streaming), go to [Preferences] in rekordbox.
6.PREVIEW
Displays or hides the [PREVIEW] column.
7.Font size setting
Sets the font size.
8.Connection status icons
—(Internet connection icon): Displays the status of the internet connection.
— (Wi-Fi connection icon): Displays the status of the Wi-Fi connection. Touch to display the Network category of the Utility settings.
— (Bluetooth connection icon): Displays the status of the Bluetooth connection. Touch to display the Bluetooth category of the Utility settings.
9.Rec timer
Displays the recording time when using Master Rec.
Touch to display the [MIXER SETTINGS] screen.
10. (Information)
Displays the detailed information for the loaded track.
11.Deck display
■Playback screen (waveform screen)
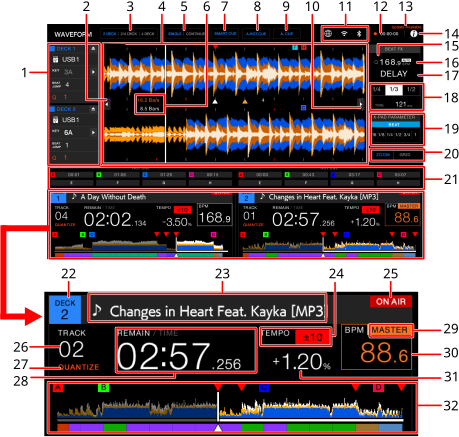
1.Deck information
Displays the following information for the deck and the loaded track.
—Deck number
— : Unloads the loaded track (you can’t unload the track playing when [Eject/Load Lock] is set to [Lock] in the Utility settings.
Set it to [Unlock] or press the [ ] button to pause, then touch []).
—Device: Displays where the track is saved.
—Key: Displays the key of the track.
— (Key Shift)
—Number of beats for Beat Jump: Displays the number of beats set for a Beat Jump.
—Number of beats for a loop: Displays the number of beats set for a beat loop or a loop playing.
—ON AIR display: Displays when the output sound is available from the [MASTER 1] and [MASTER 2] terminals (only when deck information is hidden). When deck information is hidden, only the deck number and ON AIR are displayed.
—Q indication and number of beats set for Quantize: Displays in red when Quantize for that deck is turned on and active, and in gray when it’s turned on but not active.
2.Deck information tab
Shows/hides the deck information.
3.2 DECK / 2/4 DECK / 4 DECK
Switches the deck display between 2 DECK display and 4 DECK display for the deck display section and enlarged waveform.
4.Enlarged waveform
Displays the enlarged waveform, cue points, loop points, and Hot Cue points, etc. that have been analyzed by rekordbox.
•You can change the waveform color in [MY SETTINGS LOAD] or [Waveform Color] on the [SOURCE] screen.
5.SINGLE/CONTINUE
Switches the playback method between continuous play and single play for the loaded tracks.
6.Beat countdown
Displays the number of bars and beats from the playback point to the closest saved cue point.
7.SMART CUE
Turns on and off Smart Cue.
8.A. HOT CUE
Turns on and off Auto Hot Cue.
9.A. CUE
Turns on and off Auto Cue.
10.FX tab
Displays or hides the Beat FX information panel.
11.Connection status icons
—(Internet connection icon): Displays the status of the internet connection.
— (Wi-Fi connection icon): Displays the status of the Wi-Fi connection. Touch to display the Network category of the Utility settings.
— (Bluetooth connection icon): Displays the status of the Bluetooth connection. Touch to display the Bluetooth category of the Utility settings.
12.Rec timer
Displays the recording time when using Master Rec.
Touch to display the [MIXER SETTINGS] screen.
13.Update Available (update notification icon)
When connected to the Internet, an update notification will be displayed if a firmware update is available.
14. (Information)
Displays the detailed information for the loaded track.
15.Q indication (Quantize for Beat FX)
Displays in red when Quantize for Beat FX is turned on and active, and in gray when it’s turned on but not active.
16.BPM (for Beat FX)
Displays BPM (beats per minute, i.e. tempo) for Beat FX.
•[AUTO] and the automatically detected BPM are displayed when in Automatic BPM Measuring mode,
•[TAP] and BPM (in green) are displayed when in Manual BPM Input mode.
17.Beat FX
Displays the selected Beat FX (effect name).
18.Parameter
Displays the msec (milliseconds) and beat parameters set for the selected effect.
19.X-Pad status
Displays the operating position on the X-Pad.
20.ZOOM/GRID
Switches between Zoom and Grid Adjust modes.
•You can switch between Zoom and Grid Adjust modes by pressing and holding the rotary selector.
•Turn the rotary selector to control the following.
– In Zoom mode: Zooms in and out of the upper and lower waveforms on the screen at the same time.
– In Grid Adjust mode: Adjusts the beatgrid for the track loaded on the active deck.
21.Pad mode status
Displays the pad mode being used on the deck.
22.Deck number
23.Track name
Displays the track name for the loaded track.
24.Playback speed
Displays the playback speed set by the TEMPO slider.
25.ON AIR indication
Displayed when the sound from the [MASTER 1] or [MASTER 2] terminals can be output.
26.Track number
Displays the number (01-999) of the loaded track.
27.QUANTIZE indication (for deck)
Displayed in red when Quantize for that deck is turned on and active, and in gray when it’s turned on but not active.
•Set the number of beats in [Quantize Beat Value (Deck)] in the Utility settings or [Quantize Beat Value] on the [SHORTCUT] screen.
28.Time display (minutes, seconds, msec)
Displays remaining time or elapsed time.
Touch the time display to switch between remaining time and elapsed time.
•[TIME] of [REMAIN/TIME] is displayed in gray when remaining time is displayed and [REMAIN] of [REMAIN/TIME] is displayed in gray when elapsed time is displayed.
29.MASTER indication
Displayed when the deck is set as the sync master.
30.BPM (for deck)
Displays BPM (beats per minute, i.e. tempo) for the track playing.
•The measured value may differ from that measured by our DJ mixers due to differences in the measurement methods. This isn’t a malfunction.
31.Playback speed adjustment range
Displays the adjustable range from the original playback speed.
⇨Adjusting the playback speed (tempo control)
32.Overall waveform
Displays the overall waveform, cue points, loop points, and Hot Cue points, etc. that have been analyzed by rekordbox or this unit.
•The indicators on the overall waveform indicate the following.
–Playing address: Shows the track as a bar graph (horizontal line). The current playback point is indicated with a white vertical line on the bar graph.
When the time display is set to [TIME], the graph lights up from the start of the track up to the playback point to indicate elapsed time.
When the time display is set to [REMAIN], the graph goes dark to the left of the playback point, so the remaining part of the track stays lit up.
–Scale display (30-second interval)/phrase: Displays scales at 30-second intervals or displays the phrase below the playing address. You can set the display (scale or phrase) in [Waveform Divisions] of the Utility settings or on the [SHORTCUT] screen.
–Saved cue/loop points, Hot Cue/Loop points: Indicates cue/loop points and Hot Cue/Loop points saved in the track with marks above the waveform.
–Cue/loop points: Indicates cue/loop points set in the track with marks below the waveform.
–Countdown display: Displays the saved cue point that’s set as the countdown target.
•You can change the waveform color in [MY SETTINGS LOAD] or [Waveform Color] on the [SOURCE] screen.
•You can set different colors for saved cue/loop points and Hot Cue/Loop points in rekordbox.
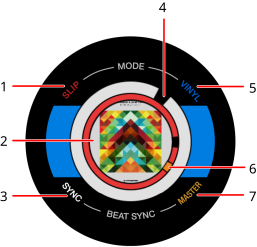
1.SLIP indicator
Lights up when Slip mode is turned on.
2.Artwork/number of beats for loop/Pad mode display
Displays artwork of the loaded track. You can set the artwork to display for each track in [Image On-Jog Display] in the Utility settings or on the [SHORTCUT] screen.
Displays the number of beats for the loop when a loop is playing.
Displays Pad mode being used on the deck in Pad mode. You can set the Pad mode display in [Pad Info Display] on the [SHORTCUT] screen.
3.SYNC indicator
Lights up when Beat Sync is turned on.
4.Playback point indicator
Indicates the playback point (turns during playback and stops when the track is paused).
5.VINYL indicator
Lights up when Vinyl mode is turned on.
6.Cue/loop/Hot Cue point indicator
Indicates cue points, loop points, or Hot Cue points.
7.MASTER indicator
Lights up when the deck is set as the sync master.
Basic operations on the touchscreen
Use the rotary selector or touch the screen to operate it.
The following functions are available.
The following functions are available.
Returning to the next level up
1Press the [BACK] button on the top panel.
The next level up (previous screen) is displayed.
•Press and hold the [BACK] button to highlight the top level in the hierarchy.